Time
Range Definition Setup
Make
sure you have completed following session(s)
What is Time Range
Definition?
“Time Range
Definition” defines a time range for Leave Taking. No matter you are entering a
leave take record from system backend, or applying leave from e-Leave web app,
you have to tell the system what time range you want to leave (e.g. 9AM –
11AM). Instead of enter the time from and time to, you may simply select a
pre-defined time range named, say “AM” or “PM”. That’s why we need to setup the
names before easy leave taking.
Basically,
you may define several time range items per Shift. As the start/end time of
each Shift are different, the corresponding set of time range items are also
different. The actual time range of each item should be referred to its Shift
time range or otherwise it is meaningless.
For
example, a single Shift with working hour from 9:00 – 18:00, lunch hour from
13:00-14:00. We may define several time range items as below:
|
Item name |
Time from |
Time to |
No. of
days |
No. of
Days / Hrs / Mins |
|
AM |
9:00 |
14:00 |
0.5 |
0 Day 4
Hrs 0 Min |
|
PM |
13:00 |
18:00 |
0.5 |
0 Day 4
Hrs 0 Min |
|
9-1130 |
9:00 |
11:30 |
0.3 |
0 Day 2
Hrs 30 Mins |
|
AM 2 hrs |
9:00 |
11:00 |
0.25 |
0 Day 2
Hrs 0 Min |
“Item name”
– Any string representing such time range. Normally, it should be short and
meaningful.
“Time from”
– The start time of the range
“Time to” –
The end time of the range. If “Time to” is smaller than “Time from”, that means
it is the time in next day.
“No. of
days” - How many days to be deduct if such time range is selected for leave
taking. Our system allow the leave deduction in non-proportion ratio of no. of
hours taken. Therefore you may deduct 0.5 day even you have just taken leave
for only 2 hours.
“No. of
Days / Hrs / Mins”-It is similar to “No. of days” but it will be applied when
the selected leave type’s display unit is “Day / Hour / Min”
Please
follow below steps to define the time ranges:
Steps
2.
Select
a Shift to define its own set of time range

3.
Click
the ![]() icon to enter “Time range definition”
screen
icon to enter “Time range definition”
screen
![]()
4.
Click
the [New] button to add a new time
range
![]()

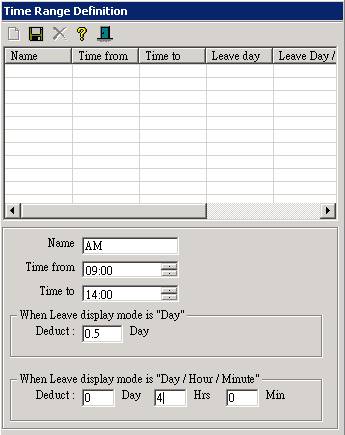
5.
Enter
the value of each field.
|
NOTE |
For the shift type
is “Single Shift”, the “Time From” and “Time To” you enter should cover the
lunch. E.g. Duty 9 – 18, Lunch 13 – 14. For “AM” time range should be 9 – 14.
And for “PM” time range should be 13 – 18. |

6.
Click
the [Save] button to confirm update
![]()
7.
Finish,
repeat step 4 to create another time range item if required